The chatbot responses to customer questions are based on the information available to it within its knowledge base. You can feed information about your business or instance to the chatbot knowledge base so that TAI can give more informed answers.
To add data to the knowledge base, login to the TAI admin and click on the Add Data link from the left navigation. You will be directed to the Add Info screen, as shown below.

Do note that knowledge bases are instance specific i.e. each chatbot instance will have a separate knowledge base. Incase you have more than one instance available for your account, you would need to first select an instance and then view /manage the knowledge base data. This can be done by selecting a instance from the drop-down on the top navigation. Selecting an instance will cause the Add Info screen to be updated with the data of the selected instance being displayed.
The additional information screen has two main sections:
- The form to add additional information
- A listing of all data that was previously added to the instance knowledge base
Adding Data to the knowledge base:
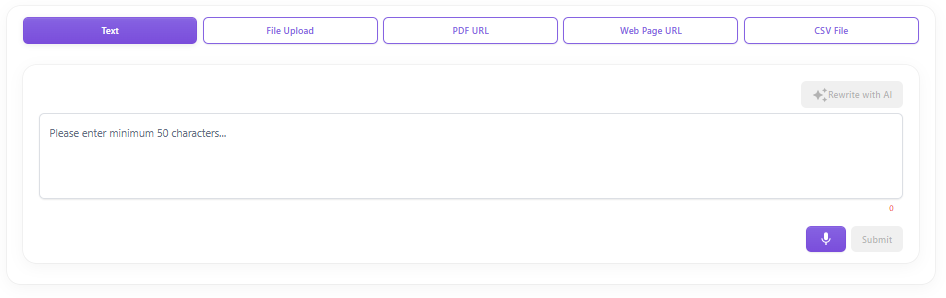
Data can be added via the following means:
1. Text
2. File Upload
3. PDF URL
4. Web Page URL
5. CSV File
You can click on the relevant button to have the form fields relevant to that mode be displayed.
- Text Input: This is a free text area wherein you can wither type in the details or speak and have your voice transcribed to text. For the chatbot responses to be effective, you need to input a minimum 50 characters. The Submit button on the form will be enabled as soon 50 characters have been entered.
You also have the option for AI to rewrite the text for you. To do so, enter the text and the click on the Rewrite with AI button.

The AI rewritten text will be displayed in the Text box. You can click on Submit to add the data.
To transcribe your voice, click on the microphone button. The microphone will be initiated and you can start speaking. The microphone button will change to a stop button. Once you have finished speaking, click the Stop button; your voice would be transcribed and added to the textbox. The transcribed text will be appended to any text that is already present in the textbox. You can edit the text, if needed. You can use the microphone option again to add on more text. Using the microphone option again, you can record and add on to the text.
Once data has been entered click on Submit to have the details saved to the knowledge base and also be added to an additional information listing.
- File Upload: This option allows to extract text from a PDF document and save it to the knowledge base. You can drag & drop or browse your file system to select the PDF file from which the text is to be extracted. Do note that the maximum file size for a PDF document is 200 MB. After selecting the file, click on Upload; the data from the PDF will be extracted and saved to the knowledge base. The extracted data will also be added to the additional information listing. The ability to upload files is governed by the data storage capacity set for your subscription plan. In case you have reached your data storage limit you would not be allowed to upload any file; you would need to upgrade to a higher plan in case you wish to increase your storage limit. The data storage limit can be tracked from the left navigation panel; herein you can see the total storage size available to you and also the storage that you have consumed.

- PDF Public URL: Herein you can provide a link to a PDF document on the Internet and have its data extracted and saved to the knowledge base. Enter the URL and click on Submit. The extracted data will be saved to the knowledge base and will also be added to the additional information listing.
- Web Page URL: Herein you can provide a link any webpage and have its data extracted and saved to the knowledge base. Enter the URL and click on Submit. The extracted data will be saved and will also be added to the additional information listing.

- CSV File: This option allows you to upload a CSV file and attach it to the chatbot instance. Do note that this is a premium feature and would be available to you based on your subscription plan. In case you do not see this option you would need to upgrade to a higher plan. To add a CSV, click on the CSV file button and then drag & drop the CSV file or browse your file system to select the CSV file that is to be uploaded. After selecting the file, click on
Upload; the CSV file will be uploaded and its link will be displayed in the form. Do note that only 1 file can be uploaded per instance and the maximum file size is 200 MB. Once the CSV has been uploaded there will be an option to delete it. Clicking on the X icon will delete the csv file. Do note, that the size of the CSV file goes towards the data storage that you have available for your account. In case you have reached the data storage limit then you will not be allowed to attach a CSV file.

Additional Info listing
Additional brand information that was previously added will be displayed under the “Additional Info” header.
Each additional info record will have an option to edit and delete it. To edit, click on the

icon, the corresponding data will appear in edit mode; make the necessary changes and click on
Update to save the changes. To delete, click on the “Delete Info” prompt and confirm the action. On confirmation the additional information will be deleted and the screen will be refreshed to reflect the changes. Do note that any meta data that has been against that data record will also be deleted.
For each additional information block, you can add meta data for it. Meta data refers to additional rich media (text, images, video, PDF, web links etc.) that provides more details on the information being added e.g. you could add an instruction manual or some references/source information about the data block. The difference between additional information and meta data is that additional information is something that the chatbot processes and responds to based on the question asked. Meta data is shown as it has been entered on this screen. Based on the query to the chatbot it will identify the meta data that is to be shown and display it below its response.
To add meta data, click on the Text or File Meta Data button that is available within the additional information record. The count of the meta data that is available for each data record will be shown against Text/File meta data buttons. Clicking on the Text/File button will open a corresponding popup. Do note that adding meta data (whether text or file) doe not count towards your data storage.
Text Metadata
Clicking on the Text button (available against a data item) will open the Text Metadata popup and will display all the text metadata that has been added to the selected data item. You can edit/delete existing text meta data or you can add new meta data.
To add new metadata, click on the Add Metadata button and fill-out the details in the form that opens up.
In the form:
1. Enter Metadata name: In this field, you can enter a short descriptive text for the meta data e.g. Read this Instruction Manual or Reference Sources. Do note that this text would be displayed as-is when it appears in a chat response.
2. Enter Metadata Value: In this field, you can enter the data that is to be shown against the name e.g. you could enter a URL to the instruction manual or link to a YouTube video or source material name etc. This will be displayed below the metadata name. In case you add a URL to a website or a PDF then when these are displayed in the chat responses, customers can click to open them in a new window.
3. Enter Metadata Description: In this field, you can enter the text that provides greater description about the metadata. This is only used by the chatbot get context about the metadata. This text is not used in chatbot responses. The description can be typed in or you could use the speech to text option to have your voice transcribed and added to the description textbox. To speak, click on the microphone button; the microphone will be initiated and you can start speaking. Click on stop to have your voice transcribed and added to the description field. You also have the option to have AI write the description for you. To do so, click on the Rewrite with AI button. AI will write up a description for you based on the Data for which the meta is being added.
Once all the fields have been filled out, click on the Submit button. The metadata will be saved and will be added to the Text meta data grid. Text meta can be edited or deleted. To edit, click on the Edit icon available against the meta data record. The details will be shown in the edit mode, you can make the necessary changes and click on Save. To delete a text meta data record, click on the Delete icon and confirm the action. Once confirmed, the record will be deleted.
File Metadata
Clicking on the File button (available against a data item) will open the File Metadata popup and will display all the files that have been added as metadata for the selected data item. You can edit/delete existing file metadata or you can add new file metadata.
To add new metadata, click on the Add File Metadata button and fill-out the details in the form that opens up.

In the form:
1.Upload File: You can choose to upload an image, video or PDF. Select the relevant option and then click on the Choose File button to browse your file system and select the file that is to be uploaded. The file will be displayed within the chat response. PDF will open in a new window, image thumbnails will be displayed within the chat and videos will be embedded within the chat.
2. Enter Metadata name: In this field, you can enter a short descriptive text for the meta data e.g. Read this Instruction Manual or Watch this Video. Do note that this text would be displayed as-is when it appears in a chat response.
3. Enter Metadata Description: In this field, you can enter the text that provides greater description about the metadata. This is only used by the chatbot get context about the metadata. This text is not used in chatbot responses. The description can be typed in or you could use the speech to text option to have your voice transcribed and added to the description textbox. To speak, click on the microphone button; the microphone will be initiated and you can start speaking. Click on stop to have your voice transcribed and added to the description field. You also have the option for AI to write the description for you. To do so, click the Rewrite with AI button. AI will use the details of the data element (to which you are adding the meta data) to create the description.
Once all the fields have been filled out, click on the Save button. The metadata will be saved and will be added to the File meta data grid. File meta can be edited or deleted. To edit, click on the Edit icon available against the meta data record. The details will be shown in the edit mode, you can make the necessary changes and click on Save. To delete a text meta data record, click on the Delete icon and confirm the action. Once confirmed, the record will be deleted.